Sunday, December 20, 2015

Clementine Chicken

**Guest Entree Entry**

Clementine Chicken

I've been thinking I'd like to try to make some orange chicken (like the kind from an Asian restaurant... is there another kind? I'm not sure...).  Anyway, so investigating some recipes online to see where I'd need to start... we starting thinking about how we could "probably" substitute "this" for "that" and that all I'd really need to get was an orange... As I was about to head off to work today, saying, "Ok, I'll get an orange on my way home..." I eyed a bag of clementines I picked up last week!  Scratched the orange off the list and realized we had everything we needed to make "Orange Chicken" in the house already!  Sweet deal! 

Ingredients in the order of how they appear in the masterpiece

1.5c water
2 tbsp freshly squeezed clementines (2 clementines)
1/2c lemon juice
1/3c white vinegar
2.5 tbsp soy sauce
1/2c canola oil, heated to what I'd call "deep frying" temperature
1 tbsp grated clementine zest (3 clementines)
1c packed light brown sugar
1/2 tsp ground ginger powder
1/2 tsp freshly minced garlic (1 clove)
2 tbsp chopped yellow onion (1/2 medium)
1/4 tsp red pepper flakes
1.5 lbs boneless, skinless chicken breast (1" cubes)
2 eggs, beaten
1c all purpose flour
1/4 tsp salt
1/4 tsp pepper
2 tbsp corn starch

Instructions

In a sauce pan, add...
1.5c water
2 tbsp freshly squeezed clementines (2 clementines)
1/2c lemon juice
1/3c white vinegar
2.5 tbsp soy sauce
and bring to a simmer...

While that's heating up, get your deep dish cast-iron skillet prepared for the chicken...
1/2c canola oil, heated to what I'd call "deep frying" temperature

**Turn your stove vent on!**

Now, back to the sauce pan, add...
1 tbsp grated clementine zest (3 clementines)
1c packed light brown sugar
1/2 tsp ground ginger powder
1/2 tsp freshly minced garlic (1 clove)
2 tbsp chopped yellow onion (1/2 medium)
1/4 tsp red pepper flakes
...and bring to a boil for 2-4 minutes and then remove from heat...

Meanwhile... toss cubed chicken in beaten eggs...
1.5 lbs boneless, skinless chicken breast (1" cubes)
2 eggs, beaten
... set aside for a minute

Mix the following and then transfer into a bread bag or gallon sized ziplock bag
1c all purpose flour
1/4 tsp salt
1/4 tsp pepper

Now, add the chicken cubes to the flour, shake to allow for an even coat.  Place chicken on a plate in preparation for frying.  Get a second clean plate ready with 2 paper towels on it to soak up some of the grease from the fried chicken.

Add the floured chicken to the hot oil in the skillet. Allow for one side to lightly brown before flipping so that the breading stays intact.  Cook thoroughly.

While the chicken is cooking, bring the sauce pan and its ingredients back up to a simmer. Stir in...
2 tbsp corn starch
... and stir for about 5 more minutes (it will thicken).

Keep an eye on both pans.  Once the chicken is cooked through, move it to the toweled plate to soak up the grease.  Then add the chicken to the sauce pan to coat in the sauce.


Serve over rice and with vegetables!


It's absolutely delicious and the best part about the whole meal is that we had everything we needed to make it right in our pantry/refrigerator!  Definitely worth a repeat in the future!

Friday, November 6, 2015

hummingbird cake

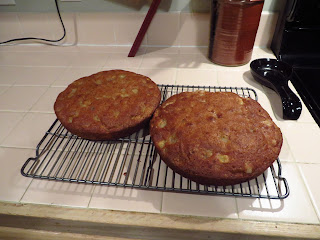
it's been awhile since i've documented something, so it's about time i put something up.  especially considering i baked this hummingbird cake on october 19!

i had been wanting to try making a hummingbird cake for awhile, and i decided to go for it.  partially because i had some bananas that were getting brown and partially because i just felt like it.  the recipe was mostly based on the one found here, but i cheated on the frosting by using a store-bought can.


 ingredients:
- 3 cups all-purpose flour
- 1 teaspoon baking soda
- 1 teaspoon salt
- 2 cups sugar
- 1 teaspoon ground cinnamon
- 3 eggs
- 1 cup canola oil
- 1 1/2 teaspoons vanilla extract
- 1 (8-ounce) can pineapple, undrained
- 1 cup pecans
- 2 cups chopped bananas (i didn't measure as much as use two or three small ones)
- cream cheese frosting (i used pillsbury)
 
preparation:
combine the dry ingredients in a large bowl.  add eggs and oil until the dry ingredients are moistened.  stir in the vanilla, pineapple, bananas, and pecans.
 
split the batter between two round cake pans (greased and floured).  bake at 350°F until  browned and a toothpick comes out clean.  i think my pans are a little bigger than the ones the recipe recommended, so it took somewhere on the order of 30-35 minutes to bake.  cool in the pans on a wire rack for about 10 minutes, and then remove from the pans to cool completely.
 
once cool, spread the cream cheese frosting between the layers and then on the outside of the whole cake.  store in the refrigerator.


verdict:
i did a few things wrong on this.  first, i made the mistake of using the pineapple chunks instead of the crushed pineapple.  don't get me wrong, it worked out just fine, but it just wasn't spread around enough.  also, i may not have broken the pecans into small enough pieces.  but these were merely cosmetic issues.  overall, the cake was delicious!  though a little dry the day it was baked, storing it in the fridge seemed to prevent it from being completely dried out on subsequent days.  i would do it again!

Sunday, July 12, 2015

blackberry quick bread

there are blackberries growing along the greenway behind the house, and they are good ones, too!  which is quite convenient and beats doing what i did last summer - which was trekking alongside the road picking somewhat inferior berries.  this weekend, i spent a couple hours picking a gallon of blackberries.

i froze most of them, but i wanted to do something different with the cup or so i reserved.  i toyed with the notion of trying something i heard from my dad...apparently a gentleman told him that the best thing to do with blackberries was to stew them with some honey or sugar and serve them over buttered biscuits (and a slice of hoop cheese on top).  this sounds like a pie without the pie, and it certainly works for strawberry shortcake, so i could see it.  however, today, i decided to try a quickbread.


i'll admit that i took this recipe from something i found online.  i suppose the joy of cooking might have had something on quickbreads in general, but i didn't find anything specific to blackberries.  so i decided the internet would provide this time.

preparation is quick/easy and only takes about 10 minutes.  cooking takes about an hour, and then it takes a little time to cool before cutting in and enjoying.

ingredients:
- 2 cups flour (all-purpose)
- 1 cup brown sugar
- 2 teaspoons baking powder
- 1/2 teaspoon salt
- blackberries (i had maybe a cup and a half or so)
- 3/4 cup milk
- 2 eggs
- 1 teaspoon vanilla extract
- most of a stick of butter

preparation:
mix the flour, sugar, baking powder, and salt into a large bowl.  gently stir in the berries until well coated.

melt the butter in a separate bowl.  mix the eggs, milk, and vanilla with the butter, and incorporate into the dry mixture.  stir batter until fully mixed and add to a greased bread pan (i used a 4" x 9" pan).  bake at 350°F for about an hour, or until the loaf is golden brown and a toothpick stabbed into the top comes out clean.  let cool for about 10 minutes before removing from the pan.

verdict:
this particular recipe is less sweet than i was expecting.  considering how there was only a cup of sugar, i suppose this shouldn't be any real surprise, but it lacks that certain something.  after talking to mom, it could be improved upon by toasting a slice with cinnamon sugar -- or by applying (gasp!) blackberry jam and/or honey.  shawn suggests adding something savory -- like perhaps a goat cheese (which i could see).

nonetheless, the bread did cook through properly, and the berries did not burst, so it was a pretty loaf.  i might play with this in the future.

zucchini casserole

so this is rather belated, but i tried a recipe a few weeks ago that i'm finally getting around to documenting.  i had some zucchini lying around and wanted to do something with it.  my initial thought was to do something similar to the pork and aubergine casserole, but it turned into something a little different along the way.


 total prep/cook time is roughly 40 minutes, and there were maybe 4-5 servings.

ingredients:


- 18 oz mild italian sausage
- 1 large zucchini
- 24 oz jar of spicy tomato and basil sauce (i used a variety called "classico")
- bag of italian six cheese  blend.

preparation:
remove the sausage from the casing and brown over medium-high heat.  when mostly browned, add thinly sliced zucchini into the pan.  when tender, add the jar of sauce and simmer mixture for several minutes.

pour mixture into a baking dish and sprinkle the cheese evenly to the top.  cover with aluminum foil and bake at 350°F for about 25 minutes.  serve over rice (i used basmati).


verdict:
this was a strange dish.  there was a nice kick to it from the sausage and the spicy tomato sauce, but it wasn't overpowering.  served over rice as it was, it felt almost like an indian curry-type dish, but it was using italian flavors.  an odd combination.  overall, it was a little watery, and there wasn't any particular textural contrast to the dish.  if i could've gotten the cheese to crisp up a bit, that might've been a worthwhile addition.  possibly baking some cheese separately on a pan and adding it afterwards could work.  all told, though, the aubergine casserole was probably superior.

Sunday, April 19, 2015

home sweet home

so jackie and i finally moved into the house.  we had already eaten here (first meal in the house being breakfast cereal is kind of an odd choice, but whatever), but until now, we had not cooked anything.  after tonight, though, we have officially broken the stove in.  what did we eat, you may ask?

drumroll, please....

box macaroni and cheese!


yes, believe it or not, we had box mac and cheese...neon-colored cheese powder and all.  granted, we did toss in a handful of sundried tomatoes (extremely tasty, by the way) and serve it with a side of green beans, so it wasn't completely kid's dinner.

i'd eat it again!

Friday, April 10, 2015

chicken roll-up

jackie was very sad that i ate the rest of the pepper stuffing last night, so i promised to make dinner tonight to make up for it.  after pondering the options and scrounging some mismatched ingredients, i decided on chicken roll-ups.  that's a technical term.  trust me, though, when i say that they taste better than the descriptive name may imply.


this dish took maybe 20 minutes to prepare and about 30 minutes to cook.  served with green beans and corn on the cob.

ingredients:
- boneless chicken cutlets (i didn't pay attention to the weight)
- sundried tomatoes
- baby spinach
- bacon
- feta cheese (i used garlic & herb crumbles)
- lemon juice
- salt/pepper

preparation:
wilt the spinach in a pan (medium heat) with a little bacon fat.  add sundried tomatoes (i have a little jar with tomatoes and herbed oils) to the mix, and crumble in about three pieces of cooked bacon.  add a little black pepper and lemon juice, and stir until warm.  remove from heat.

pound out the chicken cutlets to make them thinner.  i will say that putting wax paper under and over the chicken makes it such that the mallet doesn't get all chickeny and contaminated.

spoon feta cheese and the spinach mixture onto each of the flattened cutlets.  roll up each cutlet and transfer to a greased pan.  put the seam on bottom so it doesn't unroll while cooking.  sprinkle with salt/pepper and more feeta, and spritz with a little lemon juice.

cover dish with foil and bake at 350°F for 20 minutes.  remove foil and bake for an additional 10 minutes or until chicken is cooked.


verdict:
this dish was amazing.  the chicken was tender, and the filling was on point.  the juice in the bottom of the pyrex was something i could just lick up!

as an improvement idea, though, i might need to pound the chicken out a little thinner.  it would make it easier to roll up.  further, if i were to serve this dish at a party or somesuch, i would definitely use the roll-up-in-saran-wrap method (a la freddington) to make a tight cylinder that wouldn't fall apart when cutting it.  jackie also speculated that capers would fit into the filling (and i think she may be on to something there).

will cook again!

Sunday, March 29, 2015

fried potato cakes

so last week, i saw a cooking show on tv where someone prepared fried potato cakes...and it looked intriguing.  later in the week, i saw a rosemary and white cheddar potato cake on a restaurant menu.  this reminded me that i thought the concept was interesting.  so i decided to attempt it on my own.  because why not?

tonight, i cooked some green beans, reheated some of jackie's pulled pork, and had some potato cakes on the side.


in this case, the potato cakes are merely a side, but i prepared them ahead of time.  prep time took about 45 minutes (of which only 10-15 are active for prep) and about 10 minutes of cooking.

ingredients:
- 1 lb redskin potatoes
- 1.5 tablespoons butter
- milk (maybe 1/8 of a cup)
- herbs/spices (dried rosemary, fresh thyme, garlic powder, salt/pepper)
- shredded cheese (i used italian six cheese blend)
- vegetable oil

preparation:
boil the potatoes ahead of the actual cooking time (taking about 30 minutes).  once cooked, drop the potatoes in a bowl and mash them with the butter and the splash of milk.  stir in the herbs.  once everything is blended, put it in the fridge for later.

when you're ready to cook, take the cheese out of the fridge and add the shredded cheese (i put in about 1/3 cup, but that really wasn't enough).  once the cheese is incorporated, form patties/cakes out of the potato mixture.  for my experiment, i made a total of seven cakes.  put the cakes back in the fridge until just before cooking.

add vegetable oil to the bottom of a frying pan (just enough to cover the bottom) and bring it up to a medium-high heat.  place the cakes in the pan and brown for about 1.5 minutes per side.  through trial and error, i learned to squish the cakes immediately after being placed in the pan.  this ensures they get properly flattened.  once browned, remove from the pan, place on a paper towel, and dust with some salt.


verdict:
overall, i am intrigued by this recipe.  the first couple cakes didn't work quite as well because i flipped them too soon; they thus did not brown and instead fell apart.  however, subsequent cakes turned out nicely brown/crispy on the exterior and soft/warm on the inside.

in principle, it was excellent.  however, i didn't use quite enough cheese, so that flavor profile wasn't as prominent as it could have been.  for future versions, i would need to use more cheese in the cakes (and possibly use something with more bite, like sharp cheddar).

beyond this, i see these cakes as being versatile options.  they could be used as a side dish, but they could also be made into a breakfast entree by incorporating bacon.  additionally, my lovely assistant (and chief taste tester) suggested that this could become something of a dessert by using mashed sweet potatoes, toasted nuts, and pie spices.  i could even see using cranberries or raisins in such a mixture.  certainly food for thought!

interestingly, this is the first time i've ever made homemade mashed potatoes.  admittedly, it wasn't a full-blown mashed potato recipe (which would require more milk and more thorough mashing), but i think i could manage to do that in the future.  good to know!

Wednesday, March 25, 2015

Mega Meatloaf

**GUEST ENTREE ENTRY**
Mega Meatloaf - my own concoction

So when I traditionally think of meatloaf, I don't have nice thoughts associated with it & cringe at the use of ketchup on dried out meat... GROSS!

This is the second time I have tried making meatloaf with my spin on it and both times have been a great success!  It's only taken me a few months to finally blog it though.

Ingredients
1 huge mixing bowl
1lb hot ground sausage
1lb lean ground beef
1 packet of McCormick Meatloaf Seasoning
1/4c Progresso Italian breadcrumbs
1/2c 2% milk
2 eggs
2 raw russet potatoes peeled and shredded
2c shredded carrots
1 medium yellow onion diced
1 oven safe baking bag

Roll up your sleeves and blend the two meats together.  Add the seasoning, breadcrumbs, milk, and eggs.  Add in shredded potatoes, carrots, and onion.  Keep mixing with your hands until it is fairly uniform.  It is going to be an extremely large loaf.  Transfer the meat/vegetable mixture into an oven safe baking bag.  Mold into the shape of a loaf.  Place in a Pyrex dish, loaf pan (if you can find one for this monster), or baking sheet.  Bake at 375F for 1 hour.  Enjoy!


Verdict:  It is probably the most delicious meatloaf I have ever had!  The hot sausage adds a nice kick to it & by baking it in a bag, it retains all of the moisture.  Oh and not to mention... it contains a starch & 2 vegetables inside of the loaf too, so it is a complete meal by itself!  Brian did insist on green beans; which went well with this too.

Sunday, February 1, 2015

pineapple chicken

after much debate, the matter of dinner last night was settled.  first was a thought of tacos, but that didn't sound quite right.  a vague notion of pepper stuffing was similarly discarded.  after discussing the possibility of a stir fry, jackie and i pondered orange chicken.  this (naturally) led to the idea of a sweet and sour pineapple chicken.

given how i've never made a sweet and sour sauce myself, this experiment sounded worth trying.  for a total of about 30-45 minutes to prepare and cook, we ended up with a dish with approximately four servings.


 ingredients:
- 1.25 pounds chicken (boneless breast meat, cut into chunks)
- one 12 oz package of frozen mixed vegetables (this packet had peas, carrots, broccoli, and water chestnuts)
- one 20 oz can of pineapple chunks
- 3 tablespoons brown sugar
- 3 tablespoons champagne vinegar
- 1 tablespoon honey
- 1 tablespoon soy sauce
- cayenne pepper
- ground ginger
- cornstarch

preparation:
for the sweet and sour sauce, mix the sugar, honey, soy, and vinegar into a sauce pan.  add most of the pineapple juice from the can (approximately 3/4 cup) and simmer, stirring occasionally.  after simmering for maybe 5-10 minutes, turn the heat off and leave for later steps.

add cornstarch (i didn't measure, but perhaps 1/3 of a cup) to a bread bag.  season the cornstarch with ground ginger and cayenne, and shake the bag to mix evenly.  place chunks of chicken in the bag and shake to coat thoroughly.

put oil in a large frying pan and bring to a high heat.  add the chicken to the pan to brown.  once the chicken is cooked, add the vegetables to the pan and stir until vegetables are warm.  add the pineapple and pour the sauce over everything.  stir until everything is coated evenly.  allow to simmer for several minutes.  remove and serve over rice.


verdict:
there were some flaws in this recipe -- but nothing that made it inedible.  the largest problem may have been how i cooked the chicken.  in my case, i probably underseasoned the cornstarch (more pepper and ginger would've been okay), and i didn't start with a hot enough pan.  the chicken didn't brown quite enough, and there wasn't quite enough crispiness on the outside.

also, the proportions for stir fry were a little off; i probably could've used a little less chicken and a little more vegetable.

finally, next time i may need to reduce the sweet and sour sauce a little further; it was a little more liquidy than i had anticipated.  maybe letting the sauce sit overnight would have helped it become more viscous.

all in all, though, i am pleased with myself and would try something similar again in the future.

Friday, January 23, 2015

lasagna

it isn't that i haven't cooked anything yet this year...it's more that i haven't cooked anything new or innovative yet.  i just don't feel the urge to re-blog recipes i've already cooked...unless they're different enough (or spectacularly awesome enough) to warrant a new entry.

that said, jackie and i decided to make a lasagna today.  with vegetables and such because why not.  i figure total prep and cook time was on the order of one hour, and there's something on the order of six or seven portions to this particular recipe.


ingredients:
- one 18oz package of hot italian sausage
- one zucchini (medium)
- one eggplant (relatively small)
- pasta sheets (nine)
- ricotta cheese (15 oz container)
- italian six cheese blend (8 oz bag)
- one egg
- assorted spices (parsley, basil, sage, rosemary)
- salt/pepper
- jar of spaghetti sauce

preparation:
cook the lasagna sheets per the box instructions.  remove from water and set aside.

mix the ricotta cheese with about half the bag of italian six cheese blend.  add one egg, a pinch of salt, a little pepper, and basil/parsley.  stir until well blended.

shred the eggplant and the zucchini (keep them separate).  remove the sausage from the casing and brown on medium heat with the eggplant.  i also added a little dried parsley and a little fresh sage and rosemary.  once the sausage is mostly browned, add in the zucchini.  finish browning the meat and vegetables, drain water (the zucchini gave off quite a bit), and let cool.

in a 9" x 13" dish, spread a thin layer of sauce.  place three pasta sheets side by side in the pan and smush a layer of cheese mixture on top.  add a layer of the meat mixture and more spaghetti sauce.  repeat the pasta/cheese/meat/sauce layering.  add a final layer of pasta and sauce.  sprinkle the remainder of the six cheese blend on top.  bake (covered with aluminum foil) at 350°F for about 20 minutes.  remove the foil and continue to bake for approximately 12 minutes (or until nice and bubbly).


verdict:
the sausage we used had a significant kick to it...spicy but very good!  the zucchini added a little bit of texture and color to the dish that work well.  eggplant, on the other hand, was not noticeable; i'm sure it adds something (besides a little bit of healthiness), but it's not particularly obvious.  i think a few shredded carrots would also be good in the dish, and that might be something to adjust next time.  all told, though, i am pleased.