i was poking around online trying to find a place to grab coffee with some friends, and i stumbled across something called sunflour baking company, which looked rather interesting. i mean, who wouldn't want to get fresh baked goods? so on this rather dreary sunday, i finally investigated the place.
i admit being impressed; i got a morning glory muffin and hot cocoa. the muffin, as described by the menu, is "packed with carrots, pineapples, apples, coconut, raisins, and walnuts," and it seems to be the functional equivalent of hummingbird cake. sans boiled sugar icing, of course. i would definitely get it again. the rest of the breakfast treats on display looked lovely, and i saw a corn and potato chowder on the menu, too. next time, i may have to plan a visit around their baking schedule (so as to obtain bread fresh from the oven).
it was definitely worth a 20 minute drive from huntersville. one would imagine that there would be some of a selection of independent coffee-type places in my neck of the woods, but this seems not to be the case. so i may have to wander back down again in the future.
Sunday, December 8, 2013
Saturday, December 7, 2013
eggs and sage and stuff
i clearly have fallen down on the job. i've been in huntersville for more than two months, and i haven't tried anything new that's worth documenting.
by no means am i saying that i haven't cooked anything...i've baked pies, made soup, and pan-seared chicken, pork, and other things. but it's all been food that has previously been blogged. (well, except for those toasted pumpkin seeds)
but i do seem to like frittata-type things, and i decided to document the final product of this one because it has different innards than previous versions. however, since the basic concept is the same, i won't bore you with the details (bake at 350°F until golden brown and the egg is set...easy, right?).
i'll just say that this time, i browned some zucchini and grape tomatoes in a skillet with pepper and basil, added some spinach, smoked turkey (courtesy of dad's grill), and cheddar cheese to the five egg mixture. i also used sage, garlic powder, and texas pete.
based on the smell alone, i think i like sage. in addition to that herb, i think that browning the squash and tomatoes contributed to a lovely aroma to my kitchen. and when everything was in the oven, the smoked turkey also shined through to make my apartment smell so nice.


all told, i may have slightly underseasoned the dish. there were some definite pockets of spice in the frittata, but other parts were a little bland. i suspect that the pockets correspond with the presence of the turkey. still, it's a nice dinner for a weirdly warm december evening.
Sunday, December 1, 2013
bueller?
Looks like this blog hasn't been touched in a while... who's got a suggestion for the chef(s)?
Wednesday, September 18, 2013
GUEST ENTRÉE ENTRY
Part 2 (to the Part 1 Meatball Recipe)
“The Sauce”
Ingredients
8oz pineapple chunks in juice, slice the chunks in ½
½ green pepper, 1/16th – 1/8th inch
slices
¼ c. brown sugar
1 tbsp corn starch
1 tbsp soy sauce
1 small lemon juiced
Combine all ingredients in a saucepan and bring to a boil
for 1 minute. Reduce heat to medium and
allow sauce to thicken, stirring with a wooden spoon. At this point, I was really nervous that this
thick sauce wasn’t going to be enough to prevent the meatballs from burning in
the Crock-Pot. Before adding anything
into the Crock-Pot, I added ¼ c. of H2O.
Then added the 1lb meatballs (thawed if previously frozen), and then the
sauce over them. I stirred with a wooden
spoon and set on low for 90 minutes, stirred at the ½ way mark.
I served it over white rice, prepared by box instructions...or
however you make rice...
In the future, I would add a small can of pineapple juice to the Crock-Pot instead of the water to keep the flavor + add extra juice to the sauce. Another recommendation was to perhaps perpare the meatballs with more heat, I was thinking crushed red pepper flakes would be a nice pairing to this meal.
Enjoy!

Sunday, September 15, 2013
sour cream apple pie
as a kid, i attended camp broadstone, a summer camp associated with appalachian state university, that is now (sadly) closed. one of the desserts that the kitchen staff made at least once every session was sour cream apple pie. the first time i tried it, i was astonished with how good it was...so light and fluffy.
a few years ago, i decided to replicate a version of this pie. after researching the internet, i found two recipes that looked interesting: one for a topping and one for the filling. naturally, i smashed the two recipes together into a single brilliant combination. yes, i'm very modest about my success.
as desserts go, this is one with a longer than average prep time. truthfully, it probably takes upwards of 45 minutes or more to prepare. but i rather think that the time is worth it. i generally end up cutting the pie into eighths, so it lasts...well, considerably less than eight days.

ingredients:
(crumble topping)
- 1/2 cup brown sugar
- 1/3 cup flour
- 1/4 cup butter/margarine
- 1 teaspoon cinnamon
- pinch of salt
(filling)
- 1 1/3 cup sour cream
- 2/3 cup white sugar
- 1/4 teaspoon salt
- dash of cinnamon
- 2 teaspoons vanilla
- 2 eggs
- 3 tablespoons flour
- 5-6 cups sliced apples (i used granny smith)
- shelled pecans
preparation:
first, blend all the crumble topping ingredients together in a bowl, cover, and chill. ideally, this would be done the day before you make the pie so that it can firm up overnight in the refrigerator. however, in a pinch, just stick it in the freezer for a half-hour before you start the rest of the pie filling.
for the pie filling, peel, core, and thinly slice several apples. i've learned that a potato peeler is an excellent tool for peeling apples, and then it's just a matter of slicing them up. in order to get 5-6 cups, i used four medium-sized apples. i used granny smith because it's a good pie apple (holds up well during baking) and because there weren't any pink lady apples in the grocery store. sadness.
whisk the sour cream, sugar, salt, vanilla, eggs, and flour (and a dusting of cinnamon) until smooth. since i've noticed an improvement in my omelets when i incorporate some air into the mixture with the whisk, i tried to do the same with this pie filling. add a double handful of shelled pecans (i didn't try to measure them) and the apples, and stir until all the apples are well-coated.
spoon the filling into a pie crust (i'll admit that i cheated and used a pre-made refrigerated crust). i didn't try to arrange the apple slices, but i did at least try to ensure that they were in layers (not just haphazardly poured into the pan).
take the topping mixture and crumble it evenly onto the pie filling. it should be enough to fully cover the exposed apple mixture. bake at 350°F for 1 hour 10 minutes. testing doneness with a toothpick should find the apples tender and the toothpick coming out clean.

let pie cool before serving.
verdict:
it's been awhile since i've baked it, so i had forgotten how much i enjoy this pie. i love how sour cream gets all light and fluffy when baked (even if i don't like sour cream in general), but i probably could have cooked the pie about 10 minutes more to get the filling to set just a little more.
five cups of apples almost looks like it is insufficient in the pan, but i think it's actually just about perfect; the pie filling lifts up when baking, and if any more apples were added, i think that filling would start spilling over the edge (and onto the bottom of the oven). normally, i try to add a cookie sheet under the pan to catch drips, but i forgot to do that this time...so it's just as well i didn't have excessive filling.
aside from that, i didn't add enough pecans. in the future, i probably should add a few to the top of the apples (before adding the brown sugar crumble). i've added nuts to the very top before, but those end up getting blackened because there's no coating to prevent them from burning...i suspect that putting a layer of pecans under the brown sugar would allow the topping to coat the nuts and toast them (without burning).
GUEST ENTREE ENTRY
Part 1 – Preparing the meatballs
Preheat the oven at 350F
Ingredients (mostly obtained from a local farmer’s market)
1lb local organic “Grass Fed” ground beef
1 organic egg
2 tbsp H2O
½ c. Progresso Italian bread crumbs
¼ c. minced yellow onion (~1/2 a small onion)
½ tsp sea salt
Dash of ground pepper

Meatball
Masterpiece
Homemade meatballs in a homemade Crock-Pot sauce (still searching
for the right sauce recipe)Part 1 – Preparing the meatballs
Preheat the oven at 350F
Ingredients (mostly obtained from a local farmer’s market)
1lb local organic “Grass Fed” ground beef
1 organic egg
2 tbsp H2O
½ c. Progresso Italian bread crumbs
¼ c. minced yellow onion (~1/2 a small onion)
½ tsp sea salt
Dash of ground pepper
Starting with the egg and working down the list, mix all
the ingredients thoroughly together.
Then add the beef to the mixture.
(Remove rings from fingers; this part is going to get messy). Kneed the beef into the mixture until homogeneous. Roll 1in size balls in between the palms of
your hands. On a baking sheet (I used
two lightly greased shallow pizza pans, though greasing is unnecessary because
the beef with generate enough grease to allow them not to stick), arrange the
balls evenly on the baking sheet. I
placed on the bottom 2 racks in the oven for 25 minutes. Remove from the oven and cut one open to make
sure they have been cooked thoroughly.
Should yield between 25-30 meatballs, depending on the
size... I couldn't just have 1... there were 28 total before the picture :-p

In hindsight, I should have removed the bottom sheet out
at the 23-24 minute mark. Also, since this
was my first attempt at meatballs, ever, I kept it simple… in the future, I may get
more creative with spices, perhaps crushed red pepper flakes might be in
order. But I will say, they were very tasty and melted in my mouth. I think the organic ingredients make all the difference. I will have to freeze the
meatballs until I have time to work on the sauce.
Part 2 – Preparing Crock-Pot sauce (stay tuned)
In the meantime, if you can’t wait, serve with cooked
pasta + your favorite pasta sauce, topped with parmesan or mozzarella cheese. Can’t go wrong with that!
Thanks for letting me hijack your blog ;)
guest authors
every so often, someone expresses a desire to share a recipe, which is something that should never be discouraged. i don't claim that my blog is a particularly widely-viewed one, but i still like it and am willing to let other people make use of it (instead of trying to create their own blog from scratch).
if anyone wishes to participate, i will not try to pass your recipe off as my own. you'll obviously have your own signature line at the bottom, and you probably won't be able to replicate my writing voice. if requested, i'll even introduce you before-hand!
if anyone wishes to participate, i will not try to pass your recipe off as my own. you'll obviously have your own signature line at the bottom, and you probably won't be able to replicate my writing voice. if requested, i'll even introduce you before-hand!
Tuesday, September 10, 2013
fresh peach cake
two things occur to me tonight: first, i have been making a lot of desserts lately. and secondly, i have failed to document this peach cake recipe. with the help of some fruit (sadly obtained from the grocery store...peach season is basically over), i am rectifying the latter by continuing the tradition of the former.
i obtained this particular recipe from my mother, and the sheet of paper states that it is from august 1997. i don't know where she obtained it, but it's been a favorite summer dessert for years.

ingredients:
(cake batter)
- 1 1/4 cup light brown sugar
- 1/2 cup butter/margarine
- 2 eggs
- 1 cup buttermilk (i use the powdered buttermilk instead of buying the regular liquid...it lasts forever and i don't end up with a bunch of leftover buttermilk at the end of the recipe)
- 2 cup plain flour
- 1 teaspoon baking soda
- 1 teaspoon vanilla
- 1 teaspoon cinnamon
- pinch of salt
- 2 cups chopped peaches (can substitute blueberries, strawberries, or rhubarb)
(topping)
- 1 cup light brown sugar
- 1/2 stick butter/margarine
- 1/4 cup milk
preparation:
in a fairly large mixing bowl, cream the sugar and butter; add the eggs and the vanilla. in a separate container, sift the flour with the baking soda, salt, and cinnamon. add the dry ingredients to the creamed mixture alternately with buttermilk, and stir until the batter is thoroughly mixed. add the chopped peaches and stir until well coated.
pour the cake batter into a greased 9" x 13" pan. bake at 300°F for approximately 50 minutes, or until the cake is browned. a toothpick should come out clean, and the batter should be set (ie, not still liquidish. yes, that's a technical term).
to prepare the topping, boil the ingredients together for 3 minutes and pour over the cake while it is still hot from the oven. note: do not stir the mixture while it's boiling...it won't crystallize nearly so nicely if you do. also, if you judiciously perforate the top of the cake with the toothpick before adding the topping, the sugar will be better able to penetrate. or maybe it just seems that way. i'm not quite certain.
if desired, serve the cake with whipped cream or cool whip. sprinkle a little extra cinnamon on top. i don't much care for the whipped cream, but some people do. and some of those people will even try to convince you to give them allllll the cake!

verdict:
it goes without saying that this is a wonderful dessert. it probably also goes without saying that moms always make recipes better. still, i'm quite pleased with how well i can make this cake turn out.
Saturday, September 7, 2013
bacon-wrapped apples
so i went to the georgia aquarium over the labor day weekend, and i got up close and personal with a sea otter named cruz. which was awesome! this animal interaction is well worth it if you're ever in atlanta.
you may wonder why i preface a recipe with a plug for an aquarium exhibit, but i have a very good reason.
during the encounter, we were given the opportunity to stuff otter toys with raw seafood (shrimp, clams, and octopus). sounds fishy, you say? well, maybe. but it was still fun. anyway, one of the people participating in the encounter was stuffing a round, red toy. she was commenting that it looked like an apple, and one of the otter keepers thought she said "bacon wrapped apple." the keeper thought that sounded really weird...but also kind of delicious. and i happen to agree.
so i decided to make a version of bacon-wrapped apples.

ingredients:
- 2 apples (i used gala)
- 1 package bacon (i used a package of butcher's cut)
- cinnamon
- honey
preparation:
the apples i used were nc gala (it is apple season in the carolinas, after all), but they happened to be fairly small. so i quartered them and removed the core/seeds. i wrapped the quarters in bacon, dusted them in cinnamon, drizzled a little honey on top, and secured the whole mess with toothpicks.
put parchment paper on a baking sheet, and load up the apples. bake at 425°F for 20 minutes (or until the bacon is brown and crisped. remove from oven and place on newspaper/paper towels to drain and cool.
verdict:
in hindsight, i should've used some bacon that wasn't nearly as thick...the butcher's cut didn't want to wrap quite as nicely, and frankly, it took a lot longer than i expected to cook. i ended up having to zap the apples just a little longer in the microwave to finish cooking the bacon. also, i think maybe i should've added the cinnamon and honey to the apples before applying the wrappers.
all told, i think it's an interesting combination. i'd try it again, but i'd definitely tweak the recipe next time.
Monday, August 26, 2013
blackberry cobbler
i decided it was time to make myself a blackberry cobbler. the recipe is the same as what i used earlier this year...except this time i didn't use strawberries.
the real difference, though, is that i used less margarine (about 3/4 a stick instead of a whole one), and i also used self-rising flour (as per my mother's original recipe).

i think that using self-rising flour made the biggest difference. instead of the cobbler being kind of gluey, the crust actually tasted like crust is supposed to be. on the other hand, i still didn't use enough fruit; i probably could have doubled the amount of berries or halved the crust mixture. learning experiences, i suppose.
my own opinion is that the cobbler tasted liked blackberry cobbler ought...but other people were of the opinion that i should have added more sugar. tough cookies, i say!
Sunday, August 11, 2013
roasted green beans
i've never really tried to do anything particularly fancy with green beans. generally, i'll just dump them in a pot of water and cook them on the stove, but i decided to try something different for a change. i procured some green beans from my dad this weekend, and now i want to see how roasting them works.
in addition to the roasted green beans, i went with my tomato/broccoli salad, some eye of the round steak, and some jasmine rice. for the first time in awhile, i went with a full blown meal (including multiple sides). i have been expressly forbidden to show the picture of the dinner guest, but here's what my plate looked like.

ingredients:
- green beans, ends snapped off
- olive oil
- garlic powder
- ground hot pepper
- paprika
- black pepper
- kosher sea salt
preparation:
after washing and draining the beans, i drizzled them with olive oil and mixed in the garlic powder, paprika, pepper(s), and salt. i spread them onto a baking sheet covered with parchment paper and roasted in the oven at 425°F for 15 minutes (or until the beans start to get nicely browned on the edges). obviously, the beans got moved to the serving dish thereafter; trying to put a baking sheet on the table (with everything else) just wouldn't work!
 verdict:
i had been having problems with underseasoning some of my previous roasted vegetables, so i had tried to compensate accordingly today. in this instance, i think i got a little too much salt. not to say that i completely overdid it, but it's more than i would prefer. lesson learned, i suppose.
also, i had somehow expected a slightly crispier texture overall, but that did not quite happen. this could be partially explained by my overall poor meal timing; i took the beans out of the oven well before the meat was cooked, and the rice took longer than anticipated. so the green beans sat a little while before being eaten. sadness.
still, i think that, in principle, roasted green beans are a good idea. possibly only for special occasions, though. because ordinary green beans are nice, too. and they're so much less fuss and bother.
in addition to the roasted green beans, i went with my tomato/broccoli salad, some eye of the round steak, and some jasmine rice. for the first time in awhile, i went with a full blown meal (including multiple sides). i have been expressly forbidden to show the picture of the dinner guest, but here's what my plate looked like.

ingredients:
- green beans, ends snapped off
- olive oil
- garlic powder
- ground hot pepper
- paprika
- black pepper
- kosher sea salt
preparation:
after washing and draining the beans, i drizzled them with olive oil and mixed in the garlic powder, paprika, pepper(s), and salt. i spread them onto a baking sheet covered with parchment paper and roasted in the oven at 425°F for 15 minutes (or until the beans start to get nicely browned on the edges). obviously, the beans got moved to the serving dish thereafter; trying to put a baking sheet on the table (with everything else) just wouldn't work!

i had been having problems with underseasoning some of my previous roasted vegetables, so i had tried to compensate accordingly today. in this instance, i think i got a little too much salt. not to say that i completely overdid it, but it's more than i would prefer. lesson learned, i suppose.
also, i had somehow expected a slightly crispier texture overall, but that did not quite happen. this could be partially explained by my overall poor meal timing; i took the beans out of the oven well before the meat was cooked, and the rice took longer than anticipated. so the green beans sat a little while before being eaten. sadness.
still, i think that, in principle, roasted green beans are a good idea. possibly only for special occasions, though. because ordinary green beans are nice, too. and they're so much less fuss and bother.
Monday, July 29, 2013
tomato and broccoli salad
nothing says summer like fresh, home-grown tomatoes. nothing.
so when i go home to visit my parents in summer, i of course carry off as many as i think i can possibly eat. and normally i might be content with simply slicing them onto a plate, adding a dash of salt and pepper, and either eating them with a fork or between two pieces of bread. but i thought i'd try something different today.

ingredients:
- 1 medium tomato (in this case, i think it was a better boy)
- 2 trees of broccoli (is "tree" the technical term?)
- crumbled feta cheese (i used a garlic and herb variety)
- basil
- cracked black pepper
preparation:
cut up the broccoli and tomato (i peel the tomato, too), add a liberal amount of basil, feta, and black pepper. stir and dig in.
verdict:
i had originally intended to use cucumber instead of broccoli, but the cucumbers at the grocery store were not very good looking. and i wasn't near any farm stand to pick a good one. but in the end, i'm glad...the broccoli was a nice crunch, and i think a cucumber might have made the whole thing too watery.
this can never replace a tomato sandwich, but it's definitely a worthwhile side dish. or, you know, as the meal itself...whatever works!
Sunday, July 7, 2013
parmesan roasted vegetables
ah, summer. that time of year where it gets sticky and hot and humid. but fortunately, the season also brings forth a bounty of fresh vegetables, which more than makes up for the perspiration.
new potatoes and zucchini mean dinner for brian. in fact, this means two dinners for brian.
ingredients:
- potatoes (handful of small to medium)
- zucchini (1 medium)
- olive oil
- parmesan cheese
- garlic powder
- thyme
- pepper (black, ground hot, cayenne)
preparation:
quarter the zucchini lengthwise and then cut into approximately two inch lengths. cut the potatoes into similar size chunks (quarter or half, depending on the size of the potato to begin with). toss with olive oil, and mix in garlic powder, thyme, and pepper.
spread the vegetables onto a baking sheet (covered with parchment paper) and roast at 400°F for 20 minutes, mixing occasionally. with about 5-8 minutes left on the timer, sprinkle the parmesan cheese on top.

verdict:
i'm not sure i like the thyme as much as the rosemary, but the vegetables were still tasty. beyond that, i should have added carrots. but i forgot that i had some in my fridge. sadness. also, i should have cut the potatoes a little smaller because some of them were still a little less than tender in the center.
and be warned: the potatoes are hot. i mostly blame it on the melty cheese. and the roof of my mouth doesn't like me now...
Sunday, June 30, 2013
bacon and zucchini frittata
since it was looking like rain earlier, i decided to play in the kitchen. because why not? i decided an almost-july needs bacon...even if there aren't any worthy tomatoes to go with it yet. and i had a zucchini left over from what dad gave me. so i decided on a frittata. because they're easy. and they taste good.

this recipe took a total of about one hour, and it is probably sufficient to feed a brian for four meals. jealous yet?
ingredients:
- one pound bacon
- one zucchini
- 8 eggs
- milk
- parmesan cheese
- shredded cheddar cheese
- texas pete
- ground hot pepper
- seasoned salt
- paprika
- garlic powder
- basil
- cayenne pepper
preparation:
crack the eggs into a bowl and mix thoroughly. add in about 1/2 to 2/3 cup of milk. additionally, mix in 5-6 shakes of hot sauce, ground hot pepper, cayenne pepper (not too much), a little seasoned salt, paprika, garlic powder, and basil. stir in shavings of real parmesan cheese...not that fake kraft powder. nothing against the fake kraft powder, by the way...it has it's place. i just happened to have some real parmesan that i felt like using.
take a whole package of bacon and cut it into thirds. fry in skillet on medium to medium-high heat until browned and crispy. i didn't think to time it, but i would guess the bacon frying took around 20 minutes or so. drain the grease, and add the zucchini, chunked. (and yes, "chunked" is a technical term). at this time, start preheating the oven to 350°F.
once the squash is browned, pour in the egg mixture. be sure to stir it all together to adequately mix the squash, bacon, and eggs. also, the parmesan shavings will be on top, so mix them in, as well. sprinkle shredded cheddar cheese, ground black pepper, and some paprika on top. continue cooking on medium-high until the edges begin to congeal.
move the skillet into the oven and bake for 25 minutes; the top should be nicely browned, and the egg will be set (and not runny) when poked with a fork.

verdict:
i have to say that i got the bacon about right...it turned out nice and crunchy inside the frittat, but it didn't get to that point of complete brittleness. and the zucchini was also thoroughly cooked, which is nice; crunchy bacon is one thing, but crunchy squash is not generally desirable. unless it's fried, of course.
all together, this frittata turned out well. i think it's an improvement over my previous attempts because i had sufficient filling ingredients; previously, i had skimped out of the misapprehension that i had a lot of filling material already. apparently the trick is to add more when you first think you have enough...and then you might be okay. also, anything with freshly cooked bacon has to be good!
the heat/spice factor was nice, too; there was good flavor throughout without being either overpoweringly spicy or underwhelmingly bland. i am pleased.
Thursday, June 27, 2013
roasted zucchini
my dad brought me some fresh vegetables last weekend, and i decided to try my hand at roasting zucchini.

this would be an excellent side dish. or alternately, you could do like i did and simply eat just the squash for dinner.
- one zucchini
- olive oil
- garlic powder
- rosemary
- black pepper
- ground hot pepper
preparation:
for the purposes of this roasting experiment, i cut the zucchini lengthwise into quarters, and then i chunked these lengths into pieces about 2 inches long. basically, i was looking for a manageable size piece (but not too small). toss the squash with olive oil and add liberal amounts of garlic powder, rosemary, black pepper, and hot pepper.
put parchment paper on a baking sheet, and spread the zucchini on it. roast at 400°F for 20 minutes (or until browned). sprinkle salt on top after removing the squash from the oven.
verdict:
i've never quite noticed a nutty flavor to zucchini before, but i picked up a hint of it after the roasting process. in terms of doneness, i think it got a little more cooked than i might have liked, but it wasn't overly limp. also, considering the size of the vegetable i used, maybe i should have sliced the squash into eighths...that would have given more surface area and allowed for a more even seasoning.
i am pleased.
Monday, May 20, 2013
pork and aubergine casserole
this past weekend, i was browsing the clemson farmer's market and started talking to a local farmer (of walker century farms). as i was buying some ground pork from him, he was providing commentary on how it is hard to mess up cooking (unless you simply fail to pay attention to what you're doing). as it turns out, this fellow also likes to cook, and he was kind enough to provide me with a recipe.
this is not that recipe. but he did give me an idea. and the concept for this particular dish didn't get finalized until i was halfway through preparation. so this pork and aubergine casserole is truly an experiment. "aubergine" sounds so much more sophisticated than "eggplant," don't you think?

prep time took about 30 minutes, and cooking time took upwards of 40 minutes. this gave me about 6-7 servings.
ingredients:
- 1 aubergine (one goes a long way...these eggplants are a lot bigger than they seem)
- about 1 pound of ground pork, thawed
- 1 pint diced tomatoes (these happened to be home-grown and home-canned)
- 15 oz can of corn
- 8 oz (or so) of feta cheese
- parmesan cheese (real, not fake kraft version)
- basil
- garlic powder
- oregano
- black pepper
- ground hot pepper
- cayenne pepper
- tarragon
- thyme
- paprika
preparation:
i drained the corn and mixed it with the tomatoes in a bowl. with it, i mixed basil, garlic powder, oregano, cracked black pepper, ground hot pepper, and some tarragon. i happen to like basil and oregano with tomatoes (it feels so italian), and since mom doesn't add anything to the tomatoes when she cans them, i added quite a bit of herbs. the pepper was mostly to keep things from getting too bland, and i thought that the anise-flavor of the tarragon might add a little extra zip. whether it made a difference or not, i let the mixture sit for about half an hour in hopes that the flavors would meld a little more.
thinly slice the eggplant, and add a layer to the bottom of a 9" x 13" baking pan.
brown the pork over medium-high heat with garlic powder, cayenne pepper, thyme, black pepper, and paprika. i figured that some of the cayenne would cook off (and/or be lost in the grease), so i added a bit more than i might otherwise have thought appropriate. browning took approximately 10 minutes, after which i drained the excess grease. the pork was surprisingly lean, i must say.
once the pork is drained, stir into the tomato and corn mixture before pouring the entire bowl into the baking pan. layer any remaining eggplant on top. crumble the feta cheese on top and bake at 350°F for 25 minutes. sprinkle parmesan cheese on top and bake for an additional 3 minutes.

verdict:
flavor-wise, this turned out surprisingly well. the herbs and spices weren't overpowering, but i also managed to avoid underseasoning the dish. in and of itself, that is impressive.
to be self-critical, though, this casserole had several flaws:
live and learn, right? and yes, i realize the pictures are kind of pitiful this time...everyone has an off-day!
this is not that recipe. but he did give me an idea. and the concept for this particular dish didn't get finalized until i was halfway through preparation. so this pork and aubergine casserole is truly an experiment. "aubergine" sounds so much more sophisticated than "eggplant," don't you think?

prep time took about 30 minutes, and cooking time took upwards of 40 minutes. this gave me about 6-7 servings.
ingredients:
- 1 aubergine (one goes a long way...these eggplants are a lot bigger than they seem)
- about 1 pound of ground pork, thawed
- 1 pint diced tomatoes (these happened to be home-grown and home-canned)
- 15 oz can of corn
- 8 oz (or so) of feta cheese
- parmesan cheese (real, not fake kraft version)
- basil
- garlic powder
- oregano
- black pepper
- ground hot pepper
- cayenne pepper
- tarragon
- thyme
- paprika
preparation:
i drained the corn and mixed it with the tomatoes in a bowl. with it, i mixed basil, garlic powder, oregano, cracked black pepper, ground hot pepper, and some tarragon. i happen to like basil and oregano with tomatoes (it feels so italian), and since mom doesn't add anything to the tomatoes when she cans them, i added quite a bit of herbs. the pepper was mostly to keep things from getting too bland, and i thought that the anise-flavor of the tarragon might add a little extra zip. whether it made a difference or not, i let the mixture sit for about half an hour in hopes that the flavors would meld a little more.
thinly slice the eggplant, and add a layer to the bottom of a 9" x 13" baking pan.
brown the pork over medium-high heat with garlic powder, cayenne pepper, thyme, black pepper, and paprika. i figured that some of the cayenne would cook off (and/or be lost in the grease), so i added a bit more than i might otherwise have thought appropriate. browning took approximately 10 minutes, after which i drained the excess grease. the pork was surprisingly lean, i must say.
once the pork is drained, stir into the tomato and corn mixture before pouring the entire bowl into the baking pan. layer any remaining eggplant on top. crumble the feta cheese on top and bake at 350°F for 25 minutes. sprinkle parmesan cheese on top and bake for an additional 3 minutes.

verdict:
flavor-wise, this turned out surprisingly well. the herbs and spices weren't overpowering, but i also managed to avoid underseasoning the dish. in and of itself, that is impressive.
to be self-critical, though, this casserole had several flaws:
- too watery: i think i should have drained the tomatoes as well as the corn. also, the tomato wasn't really all that present. either i should have used more tomatoes, or i should have added some tomato paste to help coat the meat.
- upper layer of eggplant was a little tough: i probably should have brushed the top layer with olive oil or something before adding the cheese. it still tasted fine, but you could tell the baking process left the eggplant a little dry.
- lack of binding agent: i'm not sure this was particularly cohesive dish. in some ways, it felt like a deconstructed soup. fixing the first point may solve the problem, but i wonder if a thin egg mixture poured on top would have helped, too.
live and learn, right? and yes, i realize the pictures are kind of pitiful this time...everyone has an off-day!
Sunday, May 19, 2013
heaven
calvin and hobbes is arguably one of my favorite comic strips of all time. so much so that i bought the box set of the entire collection (which was supposedly one of the heaviest books on the new york times best-seller list). basically, it's a set of three coffee table books containing ten year's worth of comics. who wouldn't love this?
i decided it was time to reread this collection, and now i'm remembering why i've always thought this comic was so fantastic. case in point, the january 8, 1986 strip:

clearly, this is an awesome view of things, and it's an afterlife i wouldn't mind for myself.
incidentally, there's a calvin and hobbes search engine out there that will let you do a keyword search on the comics. pretty much awesome.
i decided it was time to reread this collection, and now i'm remembering why i've always thought this comic was so fantastic. case in point, the january 8, 1986 strip:
clearly, this is an awesome view of things, and it's an afterlife i wouldn't mind for myself.
incidentally, there's a calvin and hobbes search engine out there that will let you do a keyword search on the comics. pretty much awesome.
Monday, May 13, 2013
spinach and feta stuffed chicken
i decided to experiment last night...in this case, i stuffed some chicken breasts with spinach and feta cheese. i've never actually cooked with feta cheese before, and now i'm wondering what took me so long. and because i got distracted, i neglected to upload the description until today. shameful, i know.

prep time was on the order of 15 minutes, and cooking time was about 25 minutes. i would consider this to be a moderately fancy meal, and it takes less than an hour altogether...who'd've imagined?! if you serve the chicken with rice and vegetables on the side, what i cooked amounts to about six servings.
ingredients:
- boneless, skinless chicken breasts (i used three, or a little less than two pounds)
- feta cheese (i happened to get some flavored with garlic and herbs; about 3-4 oz)
- fresh spinach (a handful or so)
- olive oil
- salt/pepper
- basil
- paprika
- ground hot pepper
preparation:
coarsely chop the spinach, add to a small bowl, and mix the feta cheese, a little basil, some cracked black pepper, and a little olive oil (just enough to coat the mixture). the trick is judging how much spinach and feta will fit inside the chicken.
cut horizontal slits in the chicken breasts and stuff the spinach and cheese mixture inside. basically, i made the chicken into a piece of pita bread and made a pocket...make a suitably large pocket because you want to fit all the spinach and cheese inside! i ended up using toothpicks to hold the stuffing inside the chicken (two per chicken breast). rub the chicken with some more olive oil, some paprika, salt and pepper, and a little ground hot pepper, and brown it in a pan over medium-high heat (about 3 minutes per side). move to an oven-safe pan and bake uncovered at 375°F for 20 minutes.
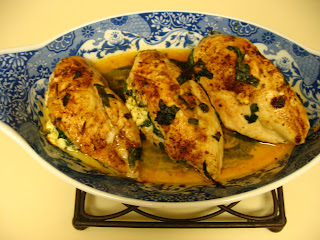
verdict:
this is a splendid meal; not to sound immodeset, but i am particularly impressed with this experiment. however, i will admit that it could be improved by wrapping the chicken in pancetta. many of the recipes i saw online called for a pancetta or bacon wrapping, but i didn't bother this time. maybe i will go for that in the future though...besides being bacon (and who doesn't like bacon?), it would have kept the spinach and feta properly on the inside of the chicken during the pan-sear. live and learn, i suppose.
Saturday, May 4, 2013
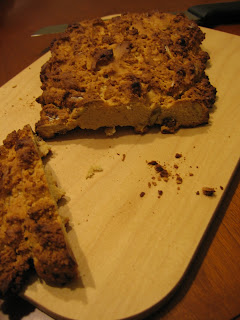
biscotti
my ice cream bread, though interesting, did not turn out to be my favorite recipe. so i decided to experiment with it. despite the self-rising flour (and probably because of my choice of baking pan), it was sort of a flat loaf. though not particularly bread-like, it had potential for a transformation into biscotti.
after eating about a quarter of the bread plain, i cut the remainder into about 1/2 inch slices and baked them at 300°F for about 11 minutes. i've never made biscotti, and waiting until the next day to do the second baking probably isn't the best way to do it, but this is the most recommended temperature i found online. the 11 minutes seemed to be about the time it took for the slices to get crispy on the cut sides.

my sister told me that i need to use a tablecloth when i'm taking pictures (to add a little bit of color contrast). a wrinkled cloth napkin will have to do for now.
anyway, dipped the finished product into caramel sauce (yes, aunt ame, i still have some left over from christmas...it's tasty, so i've been rationing it), this seems to work quite well. although i may not care to keep making ice cream bread as bread, i would certainly make it again as the first stage of biscotti!
 |
| oops. the caramel dripped. |
ravel or unravel?
i like words...it comes from having read voraciously since kindergarten. and i find it amusing that some unlikely (and seemingly opposite) words should in fact mean the same thing. for example, "flammable" and "inflammable" both mean essentially the same -- even though one has the "in-" prefix.
in the same fashion, both "ravel" and "unravel" mean to disentangle, to unweave, or to cause to come apart. granted, merriam-webster does list an obsolete definition for ravel as "to become entangled or confused," but still. words are funny like that.
greetings to all the fiber artists from ravelry.com currently reading my blog. i hope you find something you might like to try!
Friday, May 3, 2013
ice cream bread
so my sister showed me something that looked like magic. namely, the ability to turn ice cream into bread. too good to be true? apparently not, according to this article. i decided to see what all the fuss was about...and use some praline pecan ice cream.

ingredients:
2 cups ice cream
1.5 cups self-rising flour (as i have written earlier, you can make your own)
a handful of shelled pecans.
preparation:
mix the flour into the ice cream until all the flour is thoroughly moistened. i also tossed in some extra pecans -- because you can never have too many pecans in anything. add the mixture to a greased pan and bake at 350°F for about 40-45 minutes. it should be golden on top, and a toothpick poked into the crust should come out dry.
verdict:
my loaf was not particularly nice-looking. i attribute it to the fact that i didn't have a loaf pan and thus had to use a too-large (and round) cake pan. the mixture spread out instead of being properly contained. as a result, the crust is particularly crunchy...almost too much so.

all that said, it has a consistency more like poundcake than a loaf of bread, and i didn't catch much of the caramel swirl from the ice cream. as a baking experiment and all-around curiosity, i think this was successful. it will probably also taste nice toasted and spread with fig preserves. but i'm not sure i'll try it again...unless i obtain a pan more suitable for bread loaves.
also, i may just cut the loaf into pieces, bake them again, and end up with a version of biscotti. i have some caramel mix in my fridge, come to think! (and in fact, biscotti does work well)

ingredients:
2 cups ice cream
1.5 cups self-rising flour (as i have written earlier, you can make your own)
a handful of shelled pecans.
preparation:
mix the flour into the ice cream until all the flour is thoroughly moistened. i also tossed in some extra pecans -- because you can never have too many pecans in anything. add the mixture to a greased pan and bake at 350°F for about 40-45 minutes. it should be golden on top, and a toothpick poked into the crust should come out dry.
verdict:
my loaf was not particularly nice-looking. i attribute it to the fact that i didn't have a loaf pan and thus had to use a too-large (and round) cake pan. the mixture spread out instead of being properly contained. as a result, the crust is particularly crunchy...almost too much so.


all that said, it has a consistency more like poundcake than a loaf of bread, and i didn't catch much of the caramel swirl from the ice cream. as a baking experiment and all-around curiosity, i think this was successful. it will probably also taste nice toasted and spread with fig preserves. but i'm not sure i'll try it again...unless i obtain a pan more suitable for bread loaves.
also, i may just cut the loaf into pieces, bake them again, and end up with a version of biscotti. i have some caramel mix in my fridge, come to think! (and in fact, biscotti does work well)
Friday, April 19, 2013
macaroni and cheese
what is more american than macaroni and cheese? admittedly, there is a time and a place for the kraft blue box stuff, but i also like the kind that takes a little more effort. i won't claim it's gourmet or upscale, but it's yet another recipe i took from my mom and started adding extra herbs and such. i think it works. especially when it's been rainy and dreary all day.

total time (preparation + cooking) is about an hour. this amount will feed a brian for about 5 or 6 meals.
ingredients:
- pasta (i use a 13.25 oz box of whole grain rotini)
- 2 eggs
- milk (about 1.5 cups to start)
- 1/2 tsp dried mustard
- texas pete
- paprika
- black pepper
- oregano
- thyme
- shredded cheese (i use upwards of a pound)
preparation:
cook the pasta per the box's instructions and drain. i generally aim for al dente because the pasta will cook some more in the oven. while the pasta is cooking, mix the eggs, milk, texas pete (3-4 shakes), dried mustard, and paprika (a few shakes for color) in a separate bowl.
grease a casserole dish with cooking spray, and add alternate layers of pasta and shredded cheese. today, i decided to mix italian five cheese blend and sharp cheddar cheeses. yes, i cheat and buy the pre-shredded stuff, and yes i'm probably overpaying. but it's in a resealable container, and this way, i get to mix different types of cheeses! i also sprinkle oregano, thyme, and black pepper on top of the layers of cheese (before the next layer of rotini).
once all the pasta and cheese is layered (don't skimp on the top layer of cheese, either...rotini without cheese on top ends up getting hard in the oven), pour the egg mixture evenly on top. if the liquid doesn't reach to the top layer of pasta, add extra milk until it does.
bake at 350°F for 45 minutes. times may vary depending on how large (and what type) of dish. i've found that i have a corningware dish that is the perfect size for the amount of pasta i cook. the crust should be nicely browned, and the juices (when poked with a toothpick, etc) should be set.
Monday, April 8, 2013
jamaican jerk vegetables
so i'm running out of rosemary. it's a sad state of affairs, really, and it was one i wanted to rectify yesterday. however, my local grocery store was sold out of this wonderful dried herb, and i was too lazy to drive somewhere else. but there was a container of jamaican jerk seasoning...and i have always been curious to try this in cookery. i also had potatoes in my pantry, carrots in my fridge, and broccoli in my shopping basket.
naturally, i decided to mix them all together.

ingredients:
- a couple potatoes
- a handful of baby carrots
- a few florets of broccoli
- jerk seasoning
- black pepper
- garlic powder
preparation:
cut the potatoes into chunks, and trim the broccoli into manageable trees. throw these pieces, as well as the baby carrots, into a mixing bowl, and toss with olive oil. sprinkle on a healthy amount of garlic, black pepper, and jerk seasoning.
spread the vegetables on a baking pan (use parchment paper), and roast at 400°F for about 30 minutes.
verdict:
in hindsight, it probably isn't a good idea to roast the broccoli for the same duration as the potatoes and carrots. next time, i would probably roast the potatoes and carrots longer (maybe 45 minutes) and add the broccoli to the pan later (maybe 15-20 minutes before the rest is finished cooking). that way, the potatoes would become crispier, and maybe the carrots would fully caramelize.
as it was, the potatoes were cooked but lacked that extra crispiness, and the carrots were still a little al dente. and unfortunately, the broccoli was mostly blackened. also, the jamaican jerk seasoning has more of a kick than the smell from the container initally led me to believe!
Sunday, April 7, 2013
oatmeal (and such) bars
i've been contemplating this recipe (as seen on kraft's website) for years, and i finally decided to try it out. because i'm so wonderfully awesome, i'll even repeat the recipe here instead of making you go to the other site. i will say, though, that i don't quite know whether this is classified as a dessert, a breakfast bar, or something else entirely.
ingredients:
- 1 and 1/2 cup flour
- 1 and 1/2 cup oatmeal (quaker quick cook)
- 1 teaspoon baking powder
- 1/4 teaspoon salt
- 3/4 cup margarine
- 1 and 1/2 cup packed brown sugar
- 2 eggs
- 4 oz (or so) semi-sweet chocolate (i used a leftover bag of tiny chips from the back of my freezer)
- 1/2 cup (or more) pecans
- 1 cup (or so) craisins
- 1/4 cup orange juice
preparation:
mix the first four dry ingredients together (flour, oatmeal, baking powder, and salt) and set aside. thoroughly mix the margarine and brown sugar in a separate bowl. mix in the eggs, and then gradually blend in the flour mixture.
on a personal note, i tried using a hand mixer (rather than the old-fashioned spoon approach). unfortunately, the bowl i was using wasn't big enough to contain all the splatter. very messy. so i went to the fall-back spoon approach. i clearly don't do well with certain technology. how did i become an engineer again?
anyway, once the batter is mixed, add the craisins and orange juice to yet another bowl, and microwave on high for 30 seconds. as far as i can tell, the microwaving is intended to help the craisins absorb a little of the juice. also, i have no idea why orange juice and cranberries play so nicely together in recipes...but why ocean spray fails to have an orange-cranberry juice. one of the mysteries in life, i suppose.
start adding the pecans, chocolate, and craisins. once the batter is thoroughly mixed, spoon it into a 9x13 pan (pre-greased with cooking spray) and spread it out evenly. bake at 350°F for 25 minutes (it should be a light golden brown). wait until it cools before cutting into bars.

verdict:
i was somehow expecting the consistency to be somewhat akin to a chewy oatmeal cookie, but these bars were closer to a brownie or a poundcake. they're a little crumbly, but the orange juice seems to keep them at least a little moist. i'm glad i added more than the specified amount of pecans and craisins, but i think i should have added even more chocolate bits.
also, i don't think this is quite as healthy as the kraft website claims...but it still tastes nice!
 |
| see the pretty flowers? |
ingredients:
- 1 and 1/2 cup flour
- 1 and 1/2 cup oatmeal (quaker quick cook)
- 1 teaspoon baking powder
- 1/4 teaspoon salt
- 3/4 cup margarine
- 1 and 1/2 cup packed brown sugar
- 2 eggs
- 4 oz (or so) semi-sweet chocolate (i used a leftover bag of tiny chips from the back of my freezer)
- 1/2 cup (or more) pecans
- 1 cup (or so) craisins
- 1/4 cup orange juice
preparation:
mix the first four dry ingredients together (flour, oatmeal, baking powder, and salt) and set aside. thoroughly mix the margarine and brown sugar in a separate bowl. mix in the eggs, and then gradually blend in the flour mixture.
on a personal note, i tried using a hand mixer (rather than the old-fashioned spoon approach). unfortunately, the bowl i was using wasn't big enough to contain all the splatter. very messy. so i went to the fall-back spoon approach. i clearly don't do well with certain technology. how did i become an engineer again?
anyway, once the batter is mixed, add the craisins and orange juice to yet another bowl, and microwave on high for 30 seconds. as far as i can tell, the microwaving is intended to help the craisins absorb a little of the juice. also, i have no idea why orange juice and cranberries play so nicely together in recipes...but why ocean spray fails to have an orange-cranberry juice. one of the mysteries in life, i suppose.
start adding the pecans, chocolate, and craisins. once the batter is thoroughly mixed, spoon it into a 9x13 pan (pre-greased with cooking spray) and spread it out evenly. bake at 350°F for 25 minutes (it should be a light golden brown). wait until it cools before cutting into bars.

verdict:
i was somehow expecting the consistency to be somewhat akin to a chewy oatmeal cookie, but these bars were closer to a brownie or a poundcake. they're a little crumbly, but the orange juice seems to keep them at least a little moist. i'm glad i added more than the specified amount of pecans and craisins, but i think i should have added even more chocolate bits.
also, i don't think this is quite as healthy as the kraft website claims...but it still tastes nice!
Monday, March 25, 2013
self-rising flour
after being in the fridge overnight, my cobbler turned a little more glutinous than i might have anticipated. not to say that it is inedible...but i can definitely learn something from my experiment. after consulting the expert (my mother), i think that self-rising flour might have prevented this. after i bemoaned the need to buy self-rising flour, mom informed me that it is possible to make self-rising flour in the comfort of one's own kitchen! very magikal!
i can no doubt find a recipe for self-rising flour online elsewhere, but if i write things down, they stick with me better. and now i can search my own blog for these nifty little tricks.
- 1 cup flour
- 1 1/2 tsp baking powder
sift or mix very well.
presto! (or abracadabra or other magikal incantation of your choice)
Sunday, March 24, 2013
blackberry & strawberry cobbler
i've been wanting to make a cobbler for awhile, but i kept forgetting to take the blackberries out of the freezer. yesterday, however, i finally remembered to put a quart bag of berries in the fridge to thaw. and then the strawberries in the grocery store actually smelled good, so i decided to make a mixed cobbler. an experiment, if you will.

ingredients:
- 1 quart blackberries (thawed)
- about 3/4 pound strawberries
- 1.5 cups sugar
- 1 cup flour
- 3 tbsp flour
- 2 tsp cinnamon
- 1 cup milk
- 1 stick margarine
preparation:
mix the berries (coarsely chop the strawberries) with about 1/2 cup of sugar and 3 tbsp flour and set aside. in a separate bowl, mix 1 cup sugar, 1 cup flour, and 2 tsp cinnamon. preheat the oven to 350°F, and melt the margarine in a 9x13 pan.
when the margarine is melted, remove pan from the oven and pour in the berries. take the other bowl and whisk in the milk. once mixed, pour over the berries. bake cobbler at the 350°F for about 1 hour and 5 minutes. the crust should be light brown and not gooey, and the fruit shouldn't be overly runny.
in my opinion, it's best if it cools for at least a little while before serving.
verdict:
mom's recipe does call for self-rising flour in the crust, but i didn't have any. and since i don't spend a whole lot of time baking things, i figured i'd make do with the all-purpose version. and although recipe also calls for a whole stick of margarine, i think that's pretty much overkill. next time i think i'll cut back to 3/4 stick and see how that works.
also, i may have used less fruit than i should have. from what i recall, the cobbler is a lot deeper when mom made it. overall, though, i think the mixed berries works fairly well. i can't quite discern the strawberries, but the cobbler is a little less tart than if only blackberries are used. which counts as a successful experiment, in my book.
Saturday, March 23, 2013
oh, the places you'll go
i have had a particular condition for a long time now. in fact, i've had it since my senior year of high school (or possibly earlier). it's a rather insidious condition that gnaws on me if i don't provide a suitable treatment every couple years.
the travel bug bit me. i won't say that i suffer from it, but i do have an incurable case of wanderlust.
how did i end up with such a disease? well, the fact that my dad periodically traveled around the world (south korea, germany, scotland, india, italy...) for his job may have made me think about what all is out there. i don't think he particularly enjoyed travelling (or so he claimed, anyway), but dad did bring me back coins from his destinations. this may not seem like much, but seeing foreign currency does make a kid realize that the united states isn't the only place in the world.
toward the end of my senior year of high school, one of my favorite teachers (mrs. every) set up a class trip to europe. the notion of spending 10-14 days in europe sounded pretty much awesome, but i realized then that i wouldn't want to do that sort of guided tour. aside from the fact that half the stops on that particular tour didn't appeal to me, i didn't necessarily want to be stuck with 10-15 people for the duration. you could say that this was when the travel bug started buzzing around my head.
during my freshman or sophomore year at nc state, i attended a lecture that some guy gave about backpacking through europe. i don't remember his name or the specific topics of the lecture, but he talked about how easy it was to get a eurail pass and skip from place to place. he also painted an enticing picture of seeing other cultures close-up and personally. that was when the travel bug chomped down on me.
over the next couple years of college, the thought of taking a trip to europe lodged itself in the back of my head. by the time my senior year rolled around, i had decided to spend the summer after graduation backpacking through europe. a couple friends joined me, and we spent six weeks in the summer of 2006 circling western europe with about any mode of transportation imaginable (foot, taxi, train, bus, boat, and airplane). after experiencing the excitement of getting lost in a foreign country, meeting new people from all over the world, and seeing some amazing things, i can't stand the thought of never stamping my passport again.
i did add another passport stamp in 2009 when i went to portugal. nobody else wanted to go, so i spent a week and a half wandering around by myself. sadly, i haven't been out of the country since then, and it's probably getting about time for another excursion.
i have a list of places i would love to visit, but the order of priority shifts on an almost weekly basis. some people have a map on their wall with the pushpins showing where they've been or where they want to go. until i have enough wall space for a suitably large map, i'll just have to make due with a digital dartboard. the red markers show where i've been, and the blue markers show places i want to go. additionally, i'm keeping track of which states i can recall visiting (airport layovers don't count); at some point, i would love to say that i've visited all 50 states.
View digital travel dartboard in a larger map
where else do i absolutely need to visit? if there are any other must-see destinations, i ought to add them to the list.
Sunday, March 17, 2013
do i feel lucky?
well, do you, punk?
okay, so my dinner (steak, roasted potatoes, and broccoli) doesn't strike me as being particularly irish, but there is definitely some green on the plate! so i guess i'm good to go for st. patrick's day. even if the potatoes were russet and not irish...
ingredients:
- eye of the round steak (a pound or so)
- seasonings (garlic salt, black pepper, paprika, oregano)
- about a pound of russet potatoes
- olive oil
- sea salt, black pepper, rosemary, thyme, garlic powder
potato prep:
wash the potatoes and chop them into coarse chunks. liberally toss the potatoes in olive oil, along with the salt/pepper, rosemary, thyme, and garlic powder. mix until the potatoes are well coated. since i seem to be using garlic a fair amount lately, i should probably go ahead and buy some of the real thing...
put some parchment paper in the bottom of a 9x11 pan (makes cleanup easier) and roast in the oven at 400°F for 45 minutes (stirring them around once or twice to allow for even browning).
steak prep:
cut the steak into slices approximately 1/2" thick. i generally tend to cook enough for about two meals (3-5 slices, depending on overall size) and freeze the rest for later. sprinkle black pepper, garlic salt, paprika, and a little oregano onto both sides of the steak.
heat a pan (i decided to use cast iron today) to medium-high, and add some oil to the bottom. i used flaxseed, but that's mostly because i've been using it to season my cast iron, and i still have plenty left. waste not, as the man said. and from what i hear, flaxseed oil is exceedingly nutritious. from a timing perspective, i started heating the pan when the potatoes had about 15 minutes left on the roasting clock.
cook the steak for about 3 minutes per side (6 minutes or thereabouts total), and let the meat rest for about 5 minutes before serving.
verdict:
the potatoes turned out extremely well -- crispy and golden, and they were tender in the centers. i'd say almost like french fries, actually. however, i suspect that they will be a little soggy when reheated as leftovers.
the steak, on the other hand, was unfortunately overcooked. i am sad to say that i am not quite capable of consistently cooking steak on a stove; i either overcook it or undercook it almost every time i try. i guess it just means i need more practice. that said, i still think i did a decent job. perhaps it needed a touch more salt and pepper, but i was happy to eat it. especially with a side of steamed broccoli.
i know you're jealous.
okay, so my dinner (steak, roasted potatoes, and broccoli) doesn't strike me as being particularly irish, but there is definitely some green on the plate! so i guess i'm good to go for st. patrick's day. even if the potatoes were russet and not irish...
 |
| they're after me lucky charms! |
ingredients:
- eye of the round steak (a pound or so)
- seasonings (garlic salt, black pepper, paprika, oregano)
- about a pound of russet potatoes
- olive oil
- sea salt, black pepper, rosemary, thyme, garlic powder
potato prep:
wash the potatoes and chop them into coarse chunks. liberally toss the potatoes in olive oil, along with the salt/pepper, rosemary, thyme, and garlic powder. mix until the potatoes are well coated. since i seem to be using garlic a fair amount lately, i should probably go ahead and buy some of the real thing...
put some parchment paper in the bottom of a 9x11 pan (makes cleanup easier) and roast in the oven at 400°F for 45 minutes (stirring them around once or twice to allow for even browning).
steak prep:
cut the steak into slices approximately 1/2" thick. i generally tend to cook enough for about two meals (3-5 slices, depending on overall size) and freeze the rest for later. sprinkle black pepper, garlic salt, paprika, and a little oregano onto both sides of the steak.
heat a pan (i decided to use cast iron today) to medium-high, and add some oil to the bottom. i used flaxseed, but that's mostly because i've been using it to season my cast iron, and i still have plenty left. waste not, as the man said. and from what i hear, flaxseed oil is exceedingly nutritious. from a timing perspective, i started heating the pan when the potatoes had about 15 minutes left on the roasting clock.
cook the steak for about 3 minutes per side (6 minutes or thereabouts total), and let the meat rest for about 5 minutes before serving.
verdict:
the potatoes turned out extremely well -- crispy and golden, and they were tender in the centers. i'd say almost like french fries, actually. however, i suspect that they will be a little soggy when reheated as leftovers.
the steak, on the other hand, was unfortunately overcooked. i am sad to say that i am not quite capable of consistently cooking steak on a stove; i either overcook it or undercook it almost every time i try. i guess it just means i need more practice. that said, i still think i did a decent job. perhaps it needed a touch more salt and pepper, but i was happy to eat it. especially with a side of steamed broccoli.
i know you're jealous.
Saturday, March 16, 2013
frittata redux
so i decided i'd retry this frittata thing. my previous attempt wasn't unsuccessful, but the cleanup wasn't as easy as i had expected. as i see it, cast iron possibly isn't the best way to cook eggs, the skillet wasn't as well-seasoned as it needed to be, or i hadn't sufficiently greased it up before adding the mixture. fortunately, i have inherited plenty of other cooking implements.
ingredients:
6 eggs
3/4 cup milk
shredded cheddar cheese
grated parmesan
bacon pieces
broccoli
texas pete
oregano, paprika, seasoned salt, black pepper, garlic powder
preparation:
this time, i greased a glass pie pan instead of using a cast iron skillet. and since the pie pan was larger (9 inches in diameter), i made the recipe half again as large as before. as before, i mixed the eggs, milk, hot sauce, and herbs/spices in a bowl, and then i poured the mixture into the pan. since the bowl i used was pretty much filled with the eggs, i put the bacon, cheddar, and broccoli pieces in the pan, poured the egg on top, and stirred it all up. i added some parmesan, cracked black pepper, and paprika on top.
as before, i baked at 350°F, but (presumably because it was a little larger) it took about 29 minutes for the frittata to fully set.
this time, the slices of frittata came out of the pan cleanly. the only thing that confuses me is how to prevent the bacon and cheese from settling in the bottom of the dish. surely there is a way to keep the ingredients homogenized!
 |
| fancy wrought iron trivet! |
ingredients:
6 eggs
3/4 cup milk
shredded cheddar cheese
grated parmesan
bacon pieces
broccoli
texas pete
oregano, paprika, seasoned salt, black pepper, garlic powder
preparation:
this time, i greased a glass pie pan instead of using a cast iron skillet. and since the pie pan was larger (9 inches in diameter), i made the recipe half again as large as before. as before, i mixed the eggs, milk, hot sauce, and herbs/spices in a bowl, and then i poured the mixture into the pan. since the bowl i used was pretty much filled with the eggs, i put the bacon, cheddar, and broccoli pieces in the pan, poured the egg on top, and stirred it all up. i added some parmesan, cracked black pepper, and paprika on top.
as before, i baked at 350°F, but (presumably because it was a little larger) it took about 29 minutes for the frittata to fully set.
this time, the slices of frittata came out of the pan cleanly. the only thing that confuses me is how to prevent the bacon and cheese from settling in the bottom of the dish. surely there is a way to keep the ingredients homogenized!
Saturday, March 9, 2013
potato soup
one of my favorite soups is potato. it's something my mom cooked when i was a kid, and it's good for cold evenings. granted, it's not quite cold out (it was 65°F outside today), but it's supposed to cool down into the lower 40s tonight. and i wanted soup. so soup is what i made!

i should be set with leftovers for about 3 or 4 days.
ingredients:
- about 2 pounds russet potatoes
- about 1/4 pound carrots (i used baby carrots because they were in my fridge)
- celery seed (about 1/2 tsp)
- 1 big cube of chicken bouillon (mom's recipe calls for 3-4 cubes, but i do try to limit salt)
- garlic powder
- cayenne pepper (this is not per mom's recipe...but i decided to see how it worked)
- one 12 oz can of evaporated milk
- 1/4 stick margarine
- pepper
preparation:
peel and cube the potatoes, and add them to a reasonably sized pot. chop the carrots into pieces approximately the same size as the potatoes and toss them in, as well. add water until the potatoes/carrots are covered and move freely when stirred. add the bouillon, celery seed, garlic powder (about 1/2 tsp or so), and cayenne pepper (just a few shakes as an experiment in heat). bring the pot to a boil, reduce heat, and simmer (stirring occasionally).
i'm not particularly quick when it comes to the peeling and chopping (and other general prep work), so it took me about 30-45 minutes to get to the point of simmering.
simmer the soup for about an hour (or until the potatoes are tender). pour in the evaporated milk. important note: shake the can well! if you don't, the solids will settle and leave a sludge in the bottom of the can. yes, i found this out the hard way...but fortunately, that lesson was not learned today. at the same time, add the margarine and pepper. stir until warm (but do not let the mixture boil). serve and enjoy!
verdict:
i think i may have been on the verge of adding too much cayenne. it wasn't quite overpoweringly spicy, but my bowl of soup did clear my sinuses. if i decide to keep the cayenne next time, maybe i'll stick with only the two shakes. also, since i avoided using baking potatoes this time, the cubes of potato did not fall completely to mush. i am well pleased.
Wednesday, March 6, 2013
all around the world
perhaps unsurprisingly, the majority of my blog views come from the united states. after all, i live here, and my family and most of my friends live here, too. but i do have friends in foreign countries, so it's kind of neat to see that my blog audience extends to both germany and the united kingdom.
today, however, i was looking at my blog statistics, and i was intrigued to see a view from someone apparently in kazakhstan! i have absolutely no idea who i know in kazakhstan, and i didn't realize this was nifty enough to show up on search engine results. at least not yet, anyway.
if you're viewing my posts from outside the united states, please leave a comment! i'd love to hear how you discovered my blog. for that matter, i'd also be interested in hearing about recipes that i ought to try out.
Sunday, March 3, 2013
egg-cellent
so this weekend, i was cleaning an old cast iron pan that my mother gave me, and it made me think that i should find more uses for cast iron cookware. after poking around the internet, i decided that some sort of fritatta recipe looked interesting. if i hadn't been feeling distinctly lazy, i would have gone to the grocery store last night to pick up some sort of vegetables to include in my breakfast recipe. as it was, i ended up sticking to a basic bacon and cheese filling. still, i think i ended up with a worthwhile eggs-periment.

ingredients:
- 4 eggs
- 1/2 cup milk
- shredded cheddar cheese
- bacon pieces
- texas pete
- seasonings (salt, garlic powder, hot pepper, paprika, oregano)
preparation:
beat the eggs in a small bowl. add the milk and about 4-5 shakes of texas pete. add a dash of salt, some garlic powder, ground hot pepper, paprika (for color), and oregano. add bacon and cheese, and stir until well mixed.
pour mixture into a small pan. as you can see, i used what is approximately a 5 inch cast iron pan. i did coat the bottom of the pan with some oil first. bake at 350°F for 25 minutes (or until the egg is fully set). let cool for a few minutes before removing from the pan.
verdict:
i am relatively pleased with this. i wasn't sure how it would turn out because i found a variety of recipes online (various baking times and temperatures), so i chose the temperature most frequently used. this was apparently a smart choice because the end result was fluffy and well-seasoned. however, i did learn a few things from the experience:
- the smell of oregano while baking was heavenly.
- more filling ingredients would be better. don't skimp on the bacon, and i think that broccoli or spinach or other vegetables would be lovely.
- even though this particular cast iron pan seems to have a very nice layer of seasoning on it (almost glassy surface), the eggs stuck to it. very annoying to clean afterwards (coarse salt works wonders for that, though). next time, i think i'll use a glass pie pan to make this sort of dish.
Sunday, February 24, 2013
macadamia chicken
while cleaning out my freezer (who knows how long those freezer-burnt waffles had been in there), i found some boneless chicken breasts and thighs left over from a previous experiment. i had some macadamia nuts that have been sitting around for awhile, so i thought i'd see if i could combine the two and conjure up something interesting for dinner. i have to admit that i'm pleased with how things turned out.

total prep time for this was about 5-10 minutes, and total cooking time was about 30 minutes.
ingredients:
- boneless chicken (two thighs, one breast)
- flour
- 1 egg (i used two, but for three pieces of chicken, one would be more than sufficient)
- macadamia nuts (suitably pounded/crushed/chopped)
- various seasonings (cayenne pepper, garlic powder, paprika, oregano, black pepper)
- olive oil
preparation:
there are three chicken coatings for this particular experiment. first, mix some cayenne pepper, garlic powder, and paprika with the flour. this will be stage one. second, beat the egg into a bowl. this would be stage two. finally, crush the macadamia nuts. in case you weren't paying attention, this would be stage eight. i'm really not sure how best to crush macadamia nuts...my big wooden mallet didn't quite work out, so maybe it would be easier to take a knife and just chop them on a cutting board.
add olive oil to a large frying pan, and heat it to medium-high. while the pan is pre-heating, dredge the chicken in the flour mixture, and then dip it into the egg. coat one side with macadamia nut pieces, and place in the heated frying pan (macadamia nuts face-down). once in the pan, coat the top side with macadamia nuts, oregano, and black pepper. flip after 4-5 minutes. after flipping the meat, i added a little more pepper and oregano. i ended up having to flip a couple more time (for a total pan-sear time of 15 minutes).
i had expected the chicken to be cooked after about 8-10 minutes, but apparently it wasn't completely thawed, so i improvised after 15 minutes. next step involved transferring the chicken to an oven-safe pan and baking at 350°F for another fifteen minutes.
verdict:
even though it took quite awhile longer than anticipated, this macadamia-encrusted chicken was worth the wait. the crust was crispy (and not soggy), and the chicken itself turned out to be very tender and juicy. served with steamed zucchini, a worthwhile meal was had.
on the downside, the macadamia nuts didn't really stick to the chicken very well, and i managed to scorch some of them. maybe this would be less of a problem if i had gotten the pieces smaller. next time, it would probably also be smarter to sear the chicken for a shorter period of time and finish it in the oven for a little longer.
Saturday, February 23, 2013
pancake fail
complete and utter cookery failure isn't something that happens to me very often. i don't know if it's because i don't often try difficult recipes, if i have bad taste (and will eat anything), or if i'm just that good a cook...but rarely do my culinary experiments result in something that i find inedible.
this morning was different.
i decided i wanted pancakes, which is something i haven't cooked for myself in quite awhile. so i broke out the jiffy pancake mix (nothing fancy, but it generally gets the job done) and the cast iron skillet. and the nice heavy-duty spatula i got after realizing that using plastic spatulas and hot cast iron don't play well together. but alas, i had two problems.
problem one: i made the skillet too hot. using high heat brings the temperature up quickly, but then you have to remember to turn the heat back down so you don't burn everything. unfortunately, it took me two cajun-style pancakes to remember this. why two, you might ask? well, the first pancake is always an ugly mess. i think there's some universal law about this. so it took a second blackened pancake to make me think about the consequences of my inaction with regards to stove temperature.
problem two: i undercooked several pancakes. this is possibly related to the high skillet temperature in that the outsides got all nice and brown before the batter on the inside set. needless to say, uncooked pancake batter is not particularly appetizing.
out of the eight or so pancakes, only about half were edible. sadness. but on the bright side, i had sort of expected mediocre results, so i didn't even try to add chocolate chips or blueberries or such to my pancakes today. which is to say, at least i didn't waste good ingredients on failed pancakes!
and why, might you ask, would i admit such a shameful kitchen failure to the internet? well, anyone who claims to have only successful culinary experiments is full of it; mistakes will be made, and they should be noted if they are to be avoided in the future. and besides, people deserve to know that ihop may be a better option than my kitchen for pancakes...at least until i get more practice!
Friday, February 22, 2013
creative writing for amateurs

when i first saw the picture, two completely different things popped into my mind: william carlos william's poem entitled "the red wheelbarrow" and nirvana's nevermind album. random, i know, but my mind works in mysterious ways.
still, after a couple drafts, i came up with a sentence that made me happy. i have no illusions of greatness, but maybe i'll actually dabble with turning it into a story.
as soon as she hit the water, charlotte knew the dress -- a beautiful crimson silk -- would be absolutely ruined.
feel free to submit your own entry (deadline of 2/25)...but no thieving of my idea!
Subscribe to:
Comments (Atom)